Customers who place Pre-Paid orders via your eCommerce site can accrue Customer Loyalty Points in your Idealpos System after those orders have been finalised by an Idealpos POS terminal.
To enable the accrual of Customer Loyalty Points on Pre-Paid eCommerce Orders, the system must first be configured to enable this functionality by following the below steps.
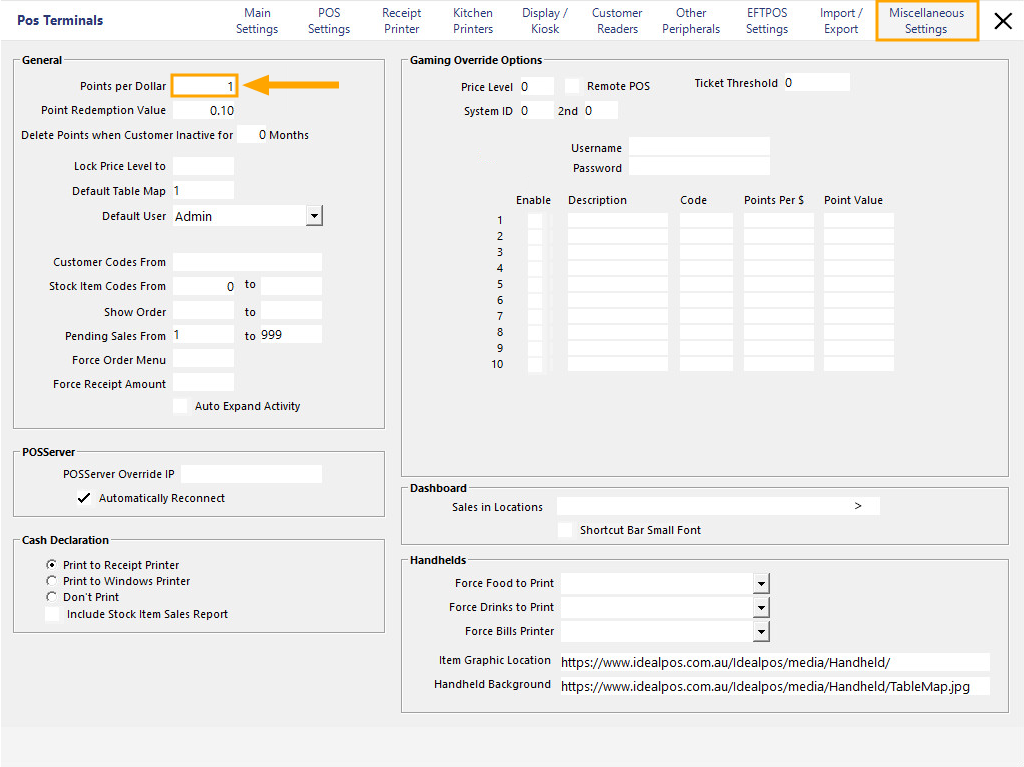
Go to: Setup > POS Terminals > Select the POS Terminal that is used for processing and handling Web Orders > Modify.
Select "Miscellaneous Settings", then ensure that a value other than "0" has been entered into the "Points per Dollar" field.
The Customer will earn the number of points entered per dollar they spend.
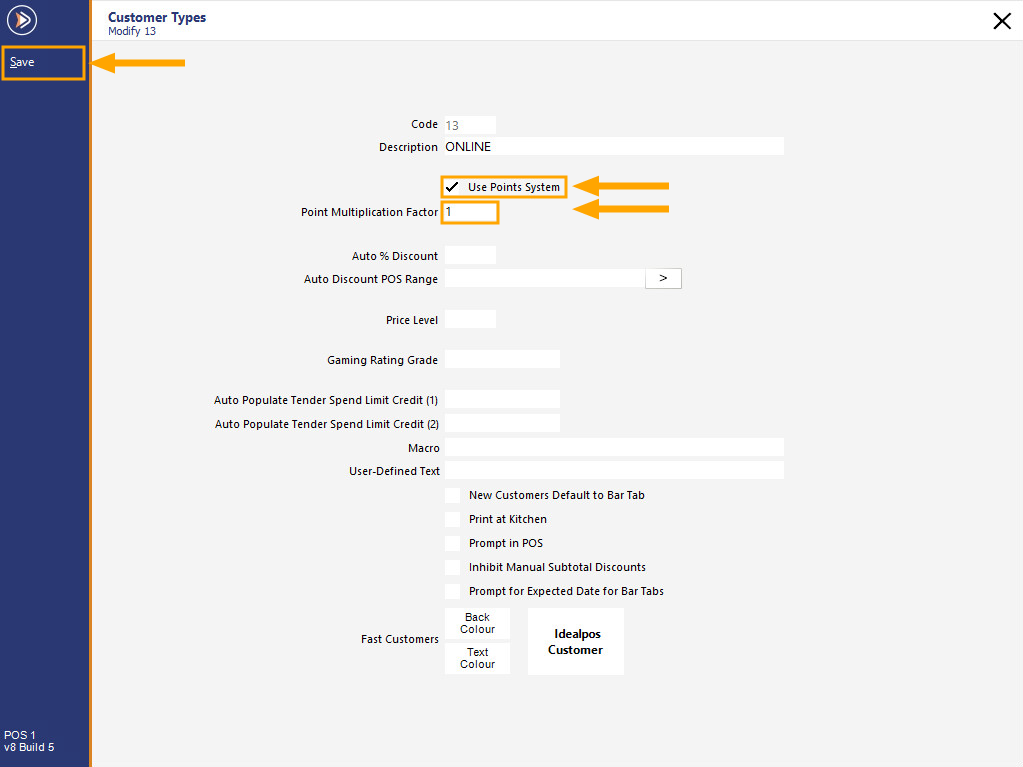
Close the POS Terminals windows then go to: File > Customers > Customer Types
Select the Customer Type(s) from the list which your Online Customers are members of, then press "Modify".
Ensure that the "Use Points System" checkbox is enabled.
Also ensure that the "Point Multiplication Factor" is set to 1.
If required, the Point Multiplication Factor can be adjusted as required.
The Point Multiplication Factor is based on the Points per Dollar value.
Example: If the Points per Dollar is set to 1 and the Point Multiplication Factor is set to 2 and the Customer purchases an item that is $10.00, they will earn 20 points.
Example 2: If the Points per Dollar is set to 2 and the Point Multiplication Factor is set to 2 and the Customer purchases an item that is $10.00, they will earn 40 points.
Example 3: If the Points per Dollar is set to 1 and the Point Multiplication Factor is set to 1 and the Customer purchases an item that is $10.00, they will earn 10 points.
Once the Customer Type has been configured, press the "Save" button on the bottom-right corner of the window.
You can repeat this step for each Customer Type that will be ordering their items via the eCommerce Web Store.
When a Customer places their order via the eCommerce Site, they will enter their First Name and Last Name.
If the name that the Customer enters when placing their order matches a Customer in Idealpos, the existing Customer in your system will earn points after their order is finalised in your store.
If the Customer does not exist in your system, they will be created automatically and will be assigned to the Default Customer Type configured in the eCommerce settings.
In order for an existing Customer to accrue points, they will need to be a member of a Customer Type which has the "Use Points System" enabled.
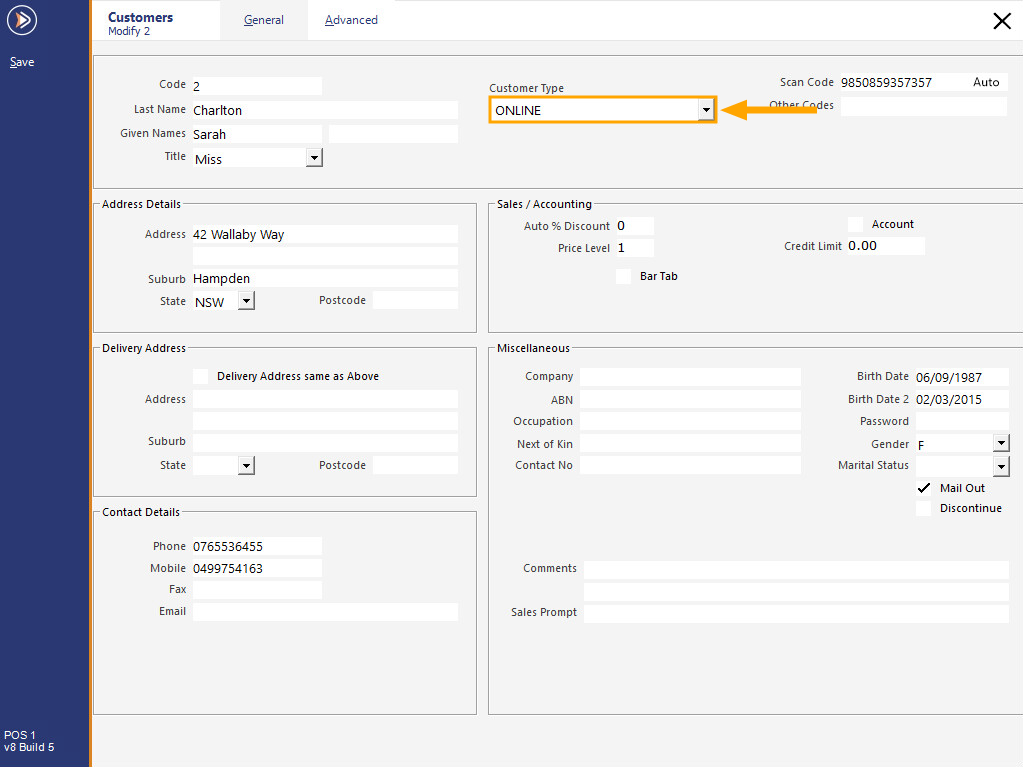
The Customer Type that a Customer is associated with can be viewed by going to: File > Customers > Customers.
Select the Customer and press "Modify".
The Customer Type will appear in the Customer Type dropdown box. If required, the Customer Type can be updated.
Note that changing the Customer Type may result in the Customer's benefits changing (e.g. the Price Level they're assigned to may change and they may miss out on promotions that are specific to the Customer Type).
The next step is to enable "Use Points" for the Tender Method that is used to process eCommerce Orders.
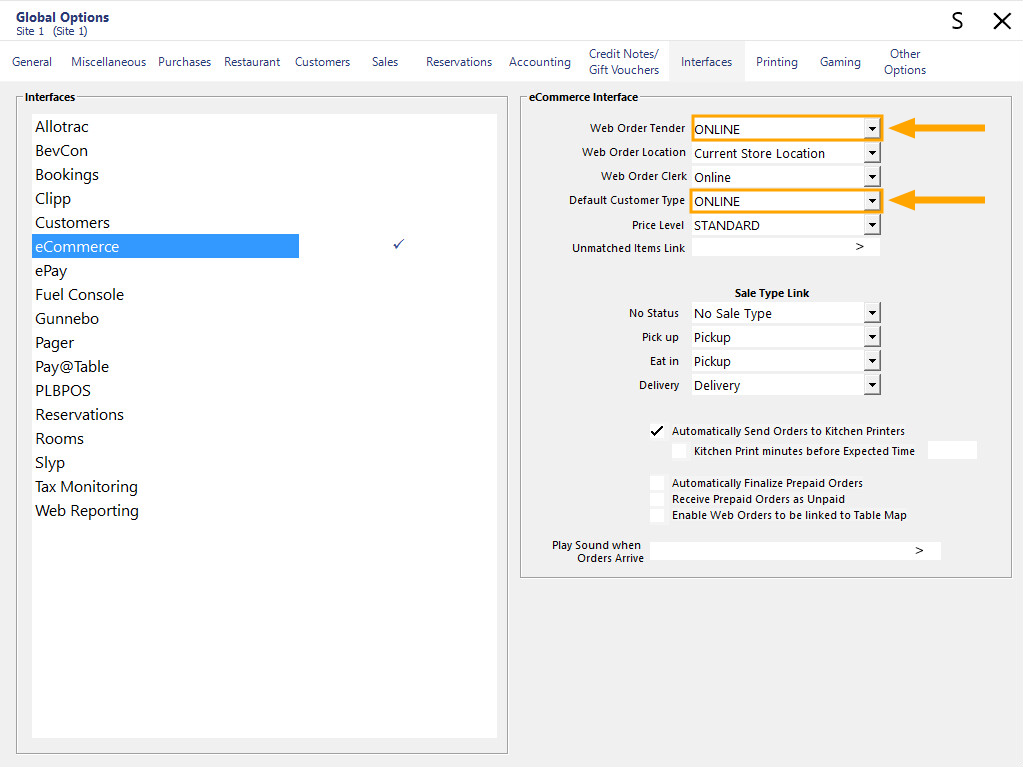
Go to: Setup > Global Options > Interfaces > eCommerce.
The Web Order Tender will be displayed.
Take note of the Tender that has been selected.
If required, you can also take this opportunity to adjust/set the Default Customer Type which will be used when a new Customer places a Web Order via your eCommerce site.
If you want the Default Customer Type to earn points, ensure that "Use Points System" has been enabled for the Default Customer Type chosen (File > Customers > Customer Types > Select Type > Modify).
Close the Global Options window, then go to:
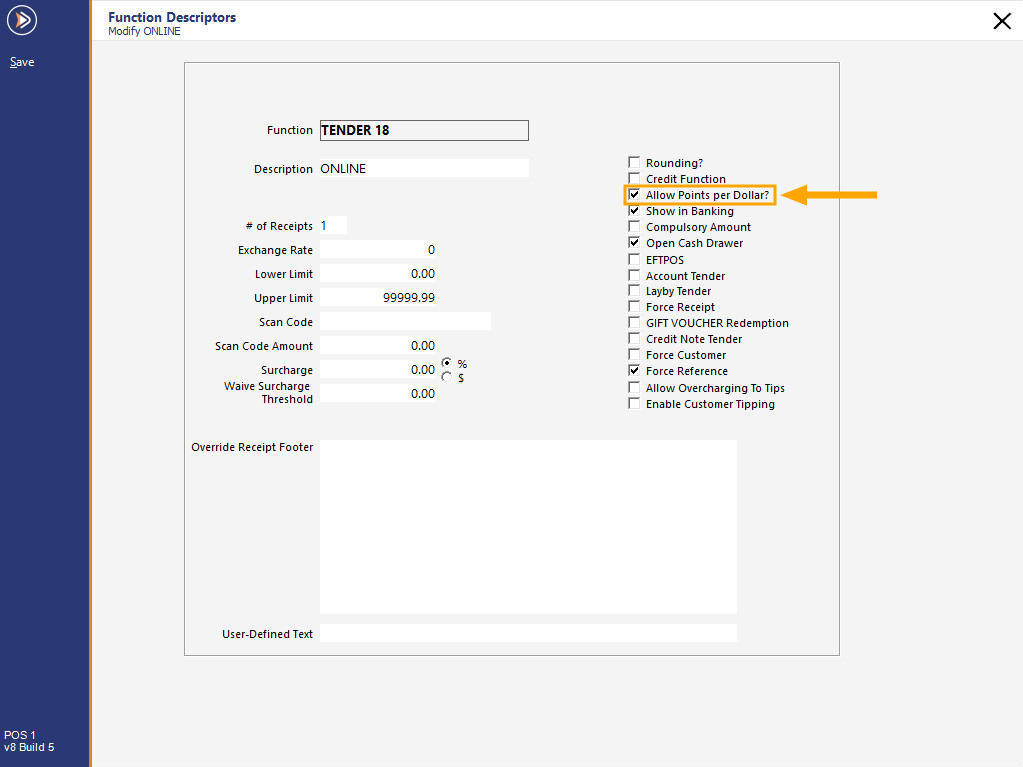
Setup > Function Descriptors > Select the Web Order Tender from the list > Modify
Enable "Allow Points per Dollar?" then press "Save to save your change.
If you want to Inhibit Points from being accrued on Delivery Charges, this can also be achieved.
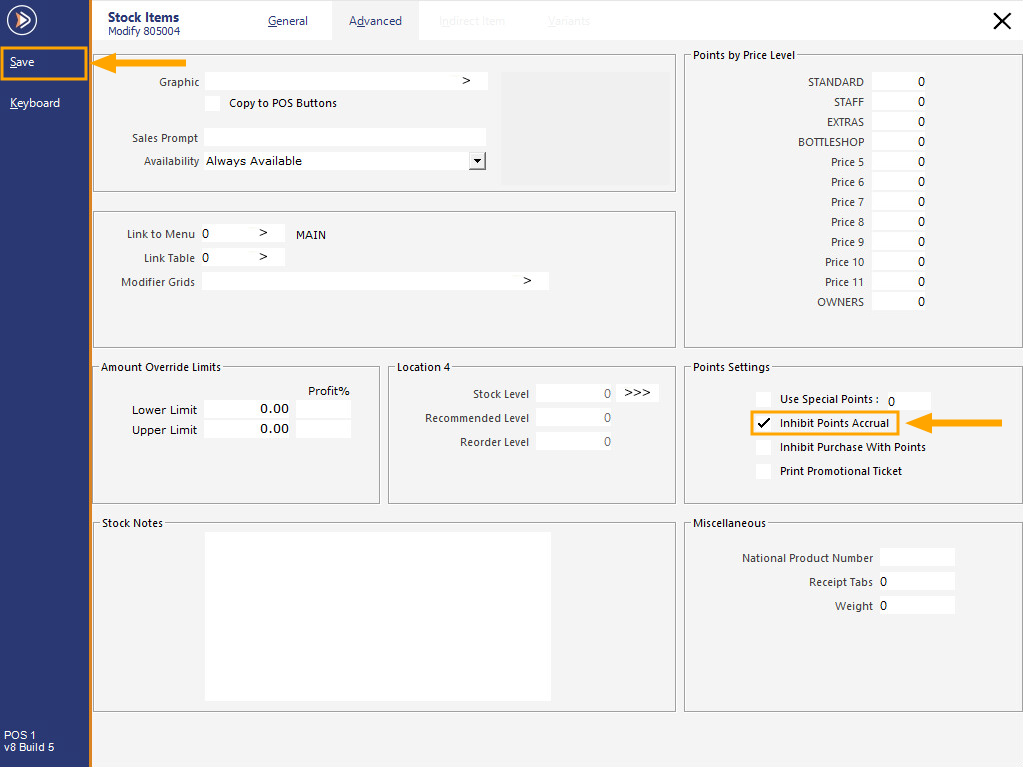
Go to: File > Stock Control > Stock Items
Select the Delivery Stock Item Code that is configured/linked to your eCommerce integration, then press "Modify".
From the Advanced tab of the Stock Item, enable "Inhibit Points Accrual".
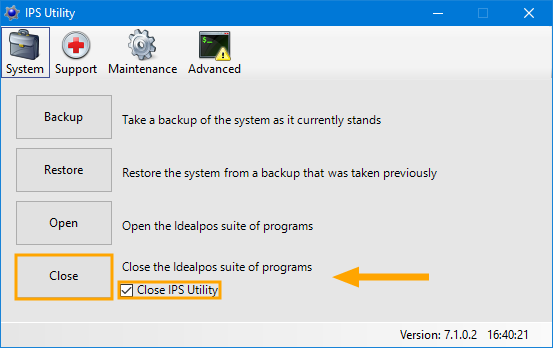
To ensure that any changes made have been applied, restart Idealpos via IPSUtils.
Go to: Start > Idealpos > IPSUtils > Press "Close" to close the Idealpos Suite.
Start Idealpos and open the POS Screen.
add the Customer to the sale to check the Points Balance.
The Points Balance will appear at the top of the Sale window next to the Customer's name.
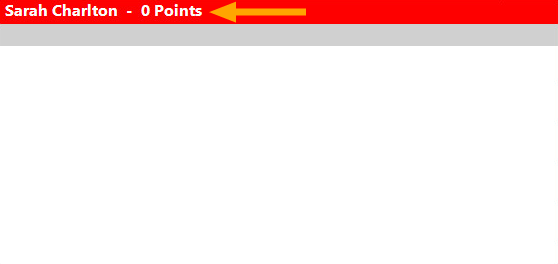
Void the sale by pressing the Void Sale Button.
Go to your eCommerce Site and place a Web Order, entering the Customer Details the same as they've been recorded in Idealpos.
Once the order has been placed and the payment has been authorised/captured, the order will be sent to Idealpos.
After the order is received by Idealpos, the POS Screen will show a "Web Orders" button along with a numeric value displayed indicative of the number of Web Orders that are waiting to be processed by the POS.
Note that if "Automatically Finalise Prepaid Web Orders" is enabled, any prepaid web orders will not trigger the "Web Orders" button to be displayed and they will simply auto finalise. Any Customers entered in the sale will automatically accrue points if the Customer Type has been configured to Use Points System.
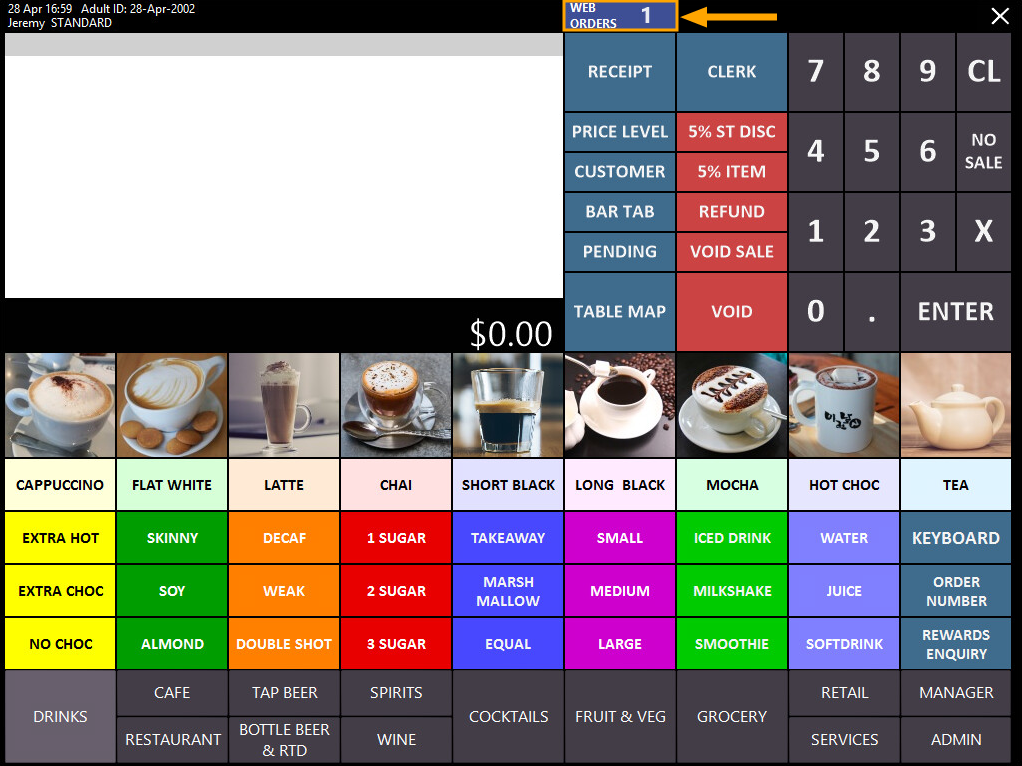
Press the "Web Orders" button to view the list of Web Orders awaiting processing.
Select the Web Order from the list, then press "Finalise" on the bottom-right corner of the window.
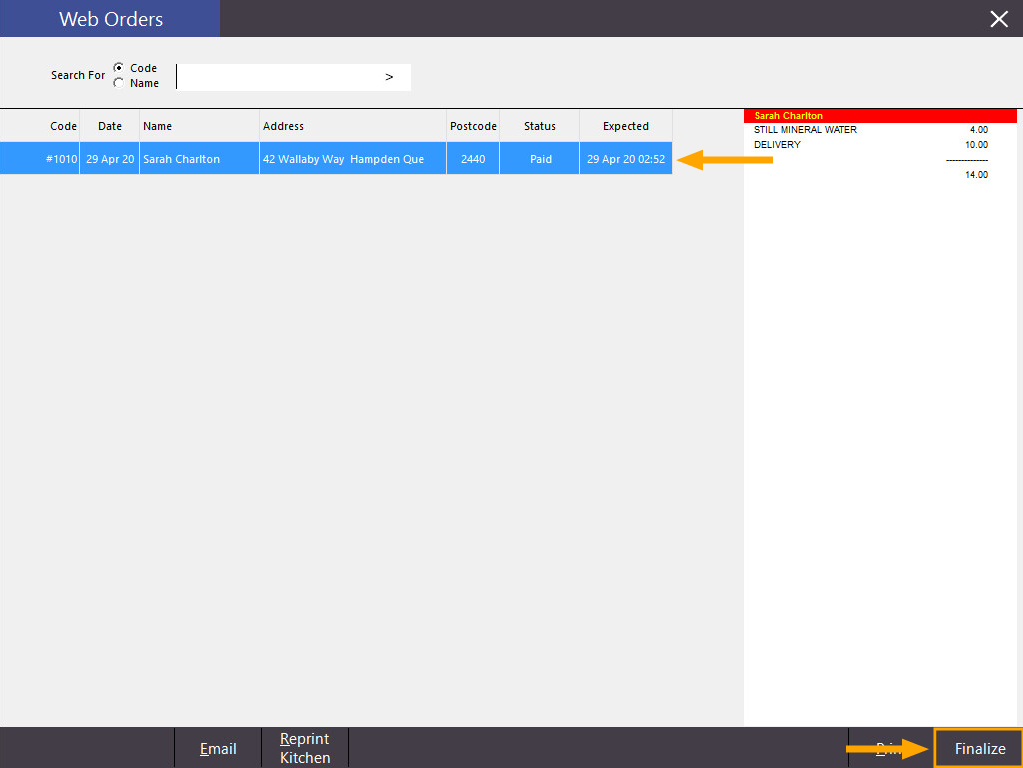
Confirm the prompt to finalise the order:

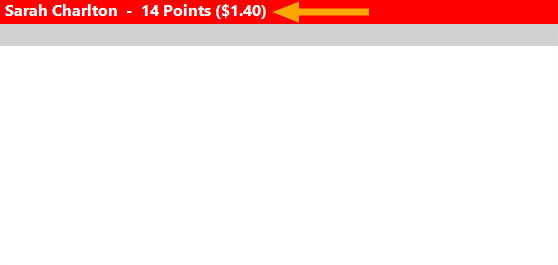
After finalising the order, the Customer will accrue the points they earned for their Web Order purchase.
This can be confirmed by adding the Customer to a sale.
The updated Points Balance will appear next to the Customer's Name as per the below example:
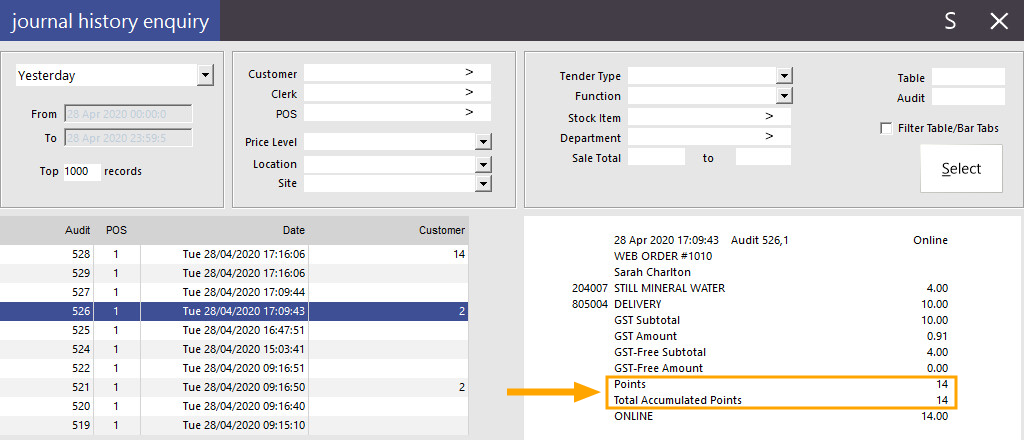
The Customer's Points Balance will also appear on the receipt and in Journal Enquiry.
Go to: Enquiry > Journal History.
Select the Journal from the list.
The Points accumulated in the current sale will be shown next to "Points" and the Customer's Total Points Balance will be listed next to "Total Accumulated Points".
In the below example, Points Accrual was not inhibited on the Delivery Item.